vuex4 都 beta 了,vuex5 还会远吗?

随着vue3的出现,vue社区的其他核心包都进行了对于vue3的升级支持,例如vue-router、vuex等。那么vuex有了哪些变化呢?今天我们一起来聊聊vuex。
我们知道vue3比较核心的两个升级点:composition-api和 更好的 typescript 支持。vuex4呢? vuex4 更新了这些东西:
- 对于
vue3的支持 - 新的安装方式
- 稍微好一点的
typescript支持 - 直接在
vuex里面集成Logger插件
我们先一起来体验一下vuex4吧。
vuex4 + vue3 的基本使用
我们试着来创建一个 vue3 + vuex4 的项目:
这里使用
vite的方式来创建
yarn create @vitejs/app
cd my-vite-app
yarn
yarn vuex@next
我们得到如下目录:
➜
.src
├── App.vue
├── assets
│   └── logo.png
├── components
│   └── HelloWorld.vue
└── main.ts
我们来使用一下vuex4: 在src目录下新建store目录,在store下面新建 index.ts
import { createStore, createLogger } from "vuex"
import config from "../config"

const store = createStore({
  state: {},
  mutations: {},
  actions: {},
  strict: config.isDev,
  plugins: config.isDev ? [createLogger()] : []
})

export default store
vuex4 为我们提供了 createStore方法,通过该方法,我们可以创建一个store,并将其暴露出去,在main.ts里面引用它:
import { createApp } from "vue"
import store from "./store"
import router from "./router"
import App from "./App.vue"

const app = createApp(App)

app.use(store)
app.use(router)
app.mount("#app")
这里和 vue2 变得有些不一样了,vue3都是通过app.use将store注入。
添加 modules
一般来说我们不经常直接在根state创建变量,所以这时候我们想到了module的方式,在store目录下面创建modules目录,在 modules 目录下面创建home 和 about 两个目录,分别创建state并导出:
// store/modules/home.index.ts
export interface HomeState {
  homeInfo: string
}

const state: HomeState = {
  homeInfo: "info from home state model"
}
const getters = {}
const mutations = {}
const actions = {}

export default {
  namespaced: true,
  state,
  getters,
  mutations,
  actions
}
// store/modules/about.index.ts
export interface AboutState {
  aboutInfo: string
}

const state: AboutState = {
  aboutInfo: "info from about state model"
}
const getters = {}
const mutations = {}
const actions = {}

export default {
  namespaced: true,
  state,
  getters,
  mutations,
  actions
}
我们在modules目录下面再创建一个index.ts,将这些module一起合并导出:
// store/modules/index.ts
import home from "./home"
import about from "./about"

const modules = {
  home,
  about
}
console.log("modules", modules)

export default modules
接着vuex4为我们提供了 useStore 方法来获取state。
本篇文章主要基于
composition-api,所以暂不介绍mapState、mapGetters、mapActions等的用法
我们试着来用一下:
<template>
	<div class="home">
		<img alt="Vue logo" src="../assets/logo.png" />
		<p>{{ homeInfo }}</p>
	</div>
</template>

<script lang="ts">
import { useStore } from 'vuex'
import { computed,defineComponent } from 'vue'
import HelloWorld from '../components/HelloWorld.vue'
import styles from './example.module.css'

export default defineComponent({
	name: 'Home',
	setup() {
		const store = useStore()
		const homeInfo = computed(() => store.state.home.homeInfo)

		return {
			homeInfo
		}
	}
})
</script>
到目前为止,我们已经实现了配置vuex4+ vue3 的基本使用.假设现在需要在home.vue取很多个 state 里面的数据呢?那么就会变成这样的:
...
const store = useStore()
const homeInfo = computed(() => store.state.home.homeInfo)
const value1 = computed(() => store.state.home.value1)
const value2 = computed(() => store.state.home.value2)
const value3 = computed(() => store.state.home.value3)
...
貌似重复代码很多,对不对?我们可以自定义一个hooks来代替这些重复操作:
import { computed } from "vue"
import { useStore } from "vuex"

const useVuexValue = (moduleName: string, storeKeys: Array<string>) => {
  let values: any = []
  const moduleNames = moduleName.split("/")
  const state = useCurry(moduleNames)
  storeKeys.forEach((storeKey) => {
    const value = computed(() => state[storeKey])
    values.push(value ? value : null)
  })
  return values
}

const useCurry = (moduleNames: Array<string>) => {
  const store = useStore()
  let state = store.state
  moduleNames.forEach((moduleName) => {
    state = state[moduleName]
  })
  return state
}

export default useVuexValue
然后我们取state变量的方法就变成了:
import { useVuexValue } from '../hooks'

...
setup() {
    const [homeInfo,value1, value2] = useVuexValue('home', ['homeInfo','value1', 'value2'])
    return {
        value1,
        value2,
        homeInfo
    }
}
...
假如home module 下面还有detail、list 等等子module,那我们取数据的方式就应该是:
...
setup() {
    const [value1, value2] = useVuexValue('home/detail', ['value1', 'value2'])
    return {
        value1,
        value2
    }
}
...
是不是看上去有点眼熟,对的就是类似于mapState的方式,不过是我们自定义的方式,同样的思路,可以封装我们自己的mutation、action等。
可能你阅读的时候注意到了,在定义每个module时,我们都声明了interface,我们都知道这是typescript的类型定义。但是我们用到了吗:

看到这个any就知道,咱们压根没法通过typrscript 来智能化提示咱们的state,那有没有方法呢?根据上面 👆 截图可知 (property) Store<any>.state: any,vuex4给我们提供了一个Store<any>.state.any,我们想办法把这两个any变成typescript类型就行了。
结合 typescript
按照官方的教程,咱们可以把typecript 和 vuex4结合起来,首先来改造一下store/index.ts:
// store/index.ts
import { InjectionKey } from "vue"
import { createStore, createLogger, Store, useStore as baseUseStore } from "vuex"
import modules from "./modules"
import config from "../config"

interface StateType {}

export const key: InjectionKey<Store<StateType>> = Symbol()

const store: Store<StateType> = createStore({
  modules,
  mutations: {},
  actions: {},
  strict: config.isDev,
  plugins: config.isDev ? [createLogger()] : []
})

export function useStore() {
  return baseUseStore(key)
}
export default store
通过export const key: InjectionKey<Store<StateType>> = Symbol() ,我们可以给咱们的stroe添加类型定义.对于这个 StateType ,咱们得想办法将modules 下面的home、about的类型定义都给囊括进来,但是一般来说,我们的module 一般来说都比较多,所以我们不直接在index.ts定义StateType。我们应该把StateType的定义抽出来,作为types,所以我们在 src 目录下新建一个types 目录,然后新建一个index.ts:
// types/index.ts
import { HomeState } from "../store/modules/home"
import { AboutState } from "../store/modules/about"

type VuexModuleType = {
  home: HomeState
  about: AboutState
}

export type StateType = VuexModuleType
在这里,我们把各个module的类型文件都导进来了,然后一起合并导出,在store/index.ts下面,我们就能取到这里的StateType:
import { StateType } from '../types'
...
export const key: InjectionKey<Store<StateType>> = Symbol()

const store: Store<StateType> = createStore({
	modules,
	mutations: {},
	actions: {},
	strict: config.isDev,
	plugins: config.isDev ? [createLogger()] : []
})
....
接下来,我们在src下面新建一个vuex.d.ts:
import { ComponentCustomProperties } from "vue"
import { StateType } from "./types"
import { Store } from "vuex"

declare module "@vue/runtime-core" {
  // provide typings for `this.$store`
  interface ComponentCustomProperties {
    $store: Store<StateType>
  }
}
现在就剩最后一步了,我们在main.ts里面拿到store暴露出来的key:
// main.ts
import { createApp } from "vue"
import store, { key } from "./store"
import router from "./router"
import App from "./App.vue"

const app = createApp(App)

app.use(router)
app.use(store, key)
app.mount("#app")
现在,我们再来试一试呢?

我们成功了,现在我们的state都能智能提示了。貌似很完美了,对吗?但是事实上,当我们在一个module下面还有子module的时候,这种方法就不可行了,例如我们在modules/home下面再增加一个子module: list
// store/modules/home/list/index.ts
export interface HomeListState {
  homeList: string
}

const state: HomeListState = {
  homeList: "list form home list state model"
}
const getters = {}
const mutations = {}
const actions = {}

export default {
  namespaced: true,
  state,
  getters,
  mutations,
  actions
}
然后在home/index.ts导入:
// moudles/home/index.ts
import list from "./list"
const getters = {}
const mutations = {}
const actions = {}

export default {
  namespaced: true,
  state,
  getters,
  mutations,
  actions,
  modules: {
    list
  }
}
然而我们使用的时候却出现了问题:

有的同学说,你得把list的类型定义(HomeListState) 加到HomeState里面啊,我们来试一试:
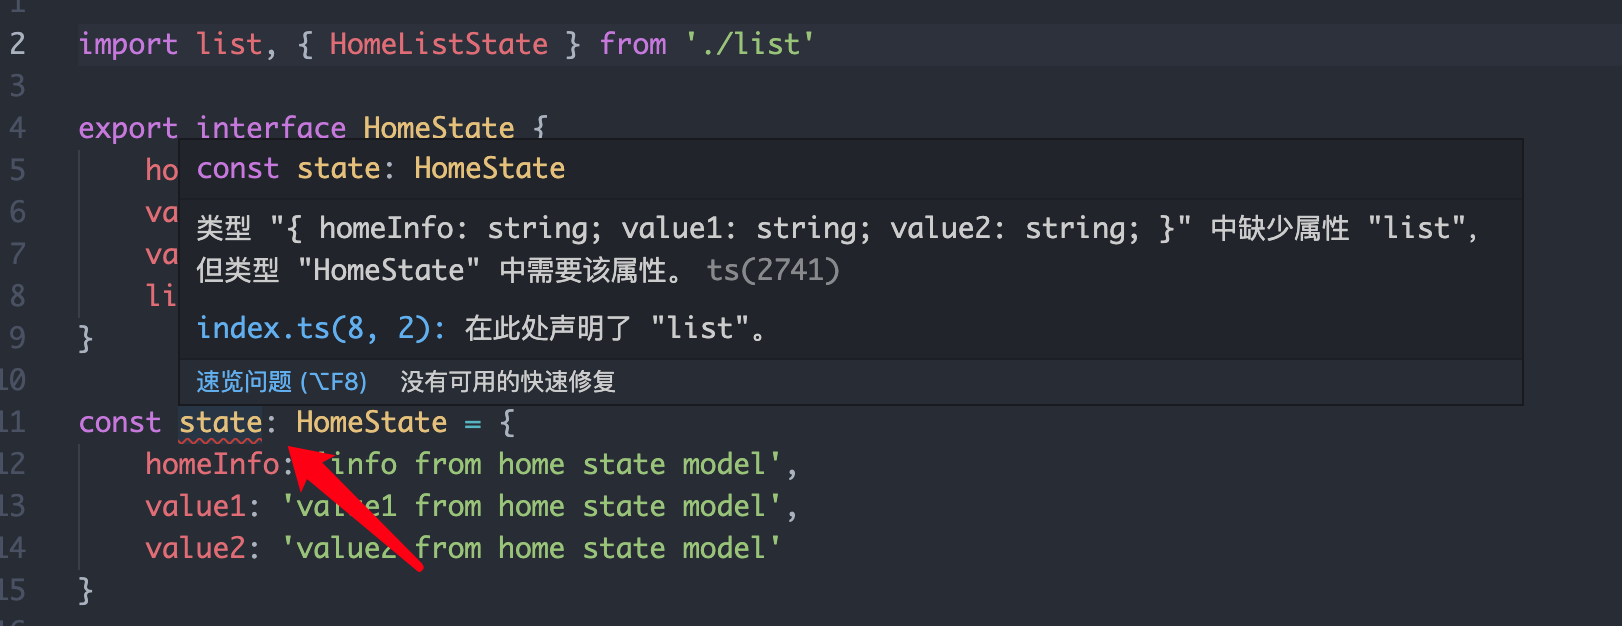
然而结果并不像想象之中那么好。甚至vuex的官方仓库也有类似的问题:how to use modules in vuex4.0
那为什么会导致这种结果呢?是因为对于父module来说,子module的类型是dynamic的,dynamic的意思是说,动态的、不确定的。那我们如何避免这个问题呢?目前来说,我们只有将子module统一提至根module,意思就是不要在module里面嵌套module。只能说,这太遗憾了。除此之外,InjectionKey<Store<StateType>> = Symbol()这种方式,给人的第一直觉,就是有一种强行适配typescript的不适感。基于上面这些原因,vuex5会完全重写,以获得完整的typescript支持。
vuex5 新特性
从最新一次Vue.js Global Online Conference 中,我们可以知道,虽然vuex4还处于beta阶段,可是vuex5已经提上了日程。根据 vuex 核心贡献者:Kia King 所说,vuex5 将有以下特性:
- 同时支持
Option API和Composition API - 完整的
TypeScript支持 - 舍弃
Mutations,只有Actions - 舍弃
nested modules,替换成Compose - 自动
Code splitting
我们来看看 vuex5 的变化吧。
Option API
我们先来看看如何定义一个基于option api的store
import { defineStore } from "vuex"
const countStore = defineStore({
  name: "couter"
})
首先,创建store的方式变了,由createStore变成defineStore,其中会包括一个name 作为identify。 接下来我们需要创建一些state:
import { defineStore } from "vuex"
const countStore = defineStore({
  name: "couter",
  state() {
    return {
      count: 1
    }
  }
})
接下来我们再创建一个getters:
import { defineStore } from "vuex"
const countStore = defineStore({
  name: "couter",
  state() {
    return {
      count: 1
    }
  },
  getters: {
    double() {
      return this.count * 2
    }
  }
})
当然还有 actions:
import { defineStore } from "vuex"
const countStore = defineStore({
  name: "couter",
  state() {
    return {
      count: 1
    }
  },
  getters: {
    double() {
      return this.count * 2
    }
  },
  actions: {
    increment() {
      this.count++
    }
  }
})
store创建好了之后,接下来我们看看如何使用它:
import { createVuex } from "vuex"
import countStore from "./countStore"

const vuex = createVuex()
const counter = Vuex.store(countStore)

// counter.count -> 1
// counter.double -> 2
// counter.increment() -> Increment
// counter.count -> 2
// counter.double -> 4
通过以上这种方式,所有的state变量都会获得完整的typescript类型定义,你不需要自己定义类似泛型 和 interface ,你就能获得他们的类型定义。刚刚我们在vuex4里面遇到的问题,全部都解决了。
接下来我们看看怎么在vue里面使用vuex5,首先还是一样的,我们应该在main.ts里面导入它,并将其注入到app里面:
import { createApp } from "vue"
import { createVuex } from "vuex"
import App from "./app.vue"

const app = createApp()
const vuex = createVuex()

app.use(vuex)
app.mount("#el")
接着在我们想要使用的地方:
<template>
	<div class="home">
		<p>count is:{{ couter.count }}</p>
        <p>double is:{{ couter.double }}</p>
        <button @click="counter.increment">
          Increment
        </button>
	</div>
</template>

<script lang="ts">
import { computed,defineComponent } from 'vue'
import counterStore from './counterStore'

export default defineComponent({
    name: 'Home',
    computed: {
        ...mapStore({
            counter: counterStore
        })
    }
})
</script>
vuex5提供了mapStore的钩子来获取state。在这里mapStore其实是this.$vuex.store(counterStore)的语法糖。
神奇的地方来了:
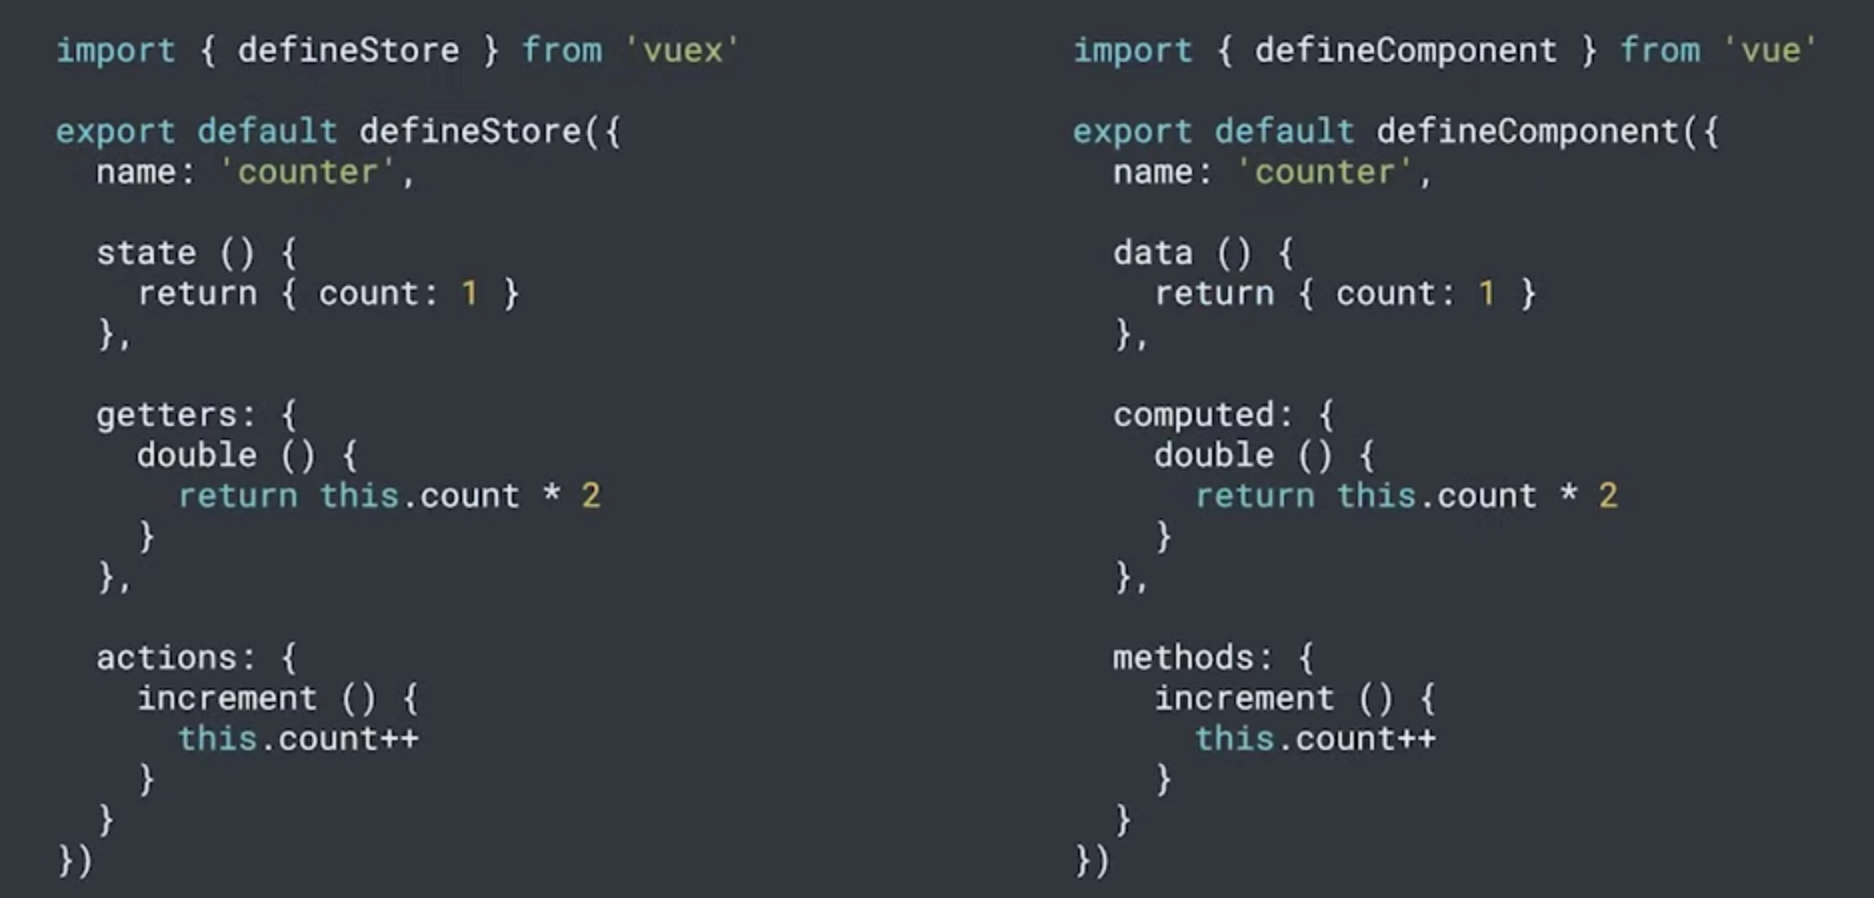
我们会发现,store的定义和vue组件的定义 几乎长得一模一样。这样做有什么好处呢?这样做,我们就能很方便的将vue组件的逻辑搬到vuex里面。同时也能保证开发的时候,组件和vuex的逻辑保持高度一致性。
接下来我们再来看看composition-api。
Composition API
import { ref, computed } from "vue"
import { defineStore } from "vuex"

const counterSore = defineStore("counter", () => {
  const count = ref(1)
  const double = computed(() => count.value * 2)

  function increment() {
    count.value++
  }

  return {
    count,
    double,
    increment
  }
})
你是不是又觉得有点眼熟,这玩意长得和现在vue3-composition-api组件的定义方式几乎一模一样。这里也是用了defineStore来定义一个Store,和option-api 不一样的是,这里用了一个callback而非一个Object。在这个callback Function 里面,我们可以使用到vue reactivity所包含的所有特性。同时我们也不需要预先去定义state、getters、actions。在这里我们只是利用ref创建了一个变量,利用computed创建了一个计算属性的变量,同时也只是定义一个了一个简单的increment 函数去变更count。
基于这样的机制,我们就可以使用vue3里面的所有其他特性,类似reactive、watch等等。相当于这完全取决于我们的自由组合,将hooks的思想放大到最大化。同时这样的方式,对于typescript来说,所有的东西都能获得完整的类型定义,终于完整地支持typescript了!!
接着还是来看看如何在vue组件中使用:
<template>
	<div class="home">
		<p>count is:{{ couter.count }}</p>
        <p>double is:{{ couter.double }}</p>
        <button @click="counter.increment">
          Increment
        </button>
	</div>
</template>

<script lang="ts">
import { computed,defineComponent } from 'vue'
import { useStore } from 'vuex'
import counterStore from './counterStore'

export default defineComponent({
    name: 'Home',
    setup () {
        const counter = useStore(counterStore)

        return {
            counter
        }
    }
})
</script>
一切都看上去那么完美。但是还有一个问题,vuex5里面没有modules,怎么办?
Store Composition
由于没有了modules,vuex5给我们提供了Store Compostion:
import { defineStore } from "vuex"
const greatStore = defineStore({
  name: "great",
  state() {
    return {
      info: "hello"
    }
  }
})
然后我们在另外的store里面如何获取呢:
import { ref, computed } from "vue"
import { defineStore } from "vuex"
import greatStore from "./greatStore"

const counterSore = defineStore("counter", ({ use }) => {
  const great = use(greatStore)
  const count = ref(1)
  const double = computed(() => count.value * 2)

  const countWithGreate = computed(() => {
    return `${great.info}-${count.value}`
  })

  function increment() {
    count.value++
  }

  return {
    count,
    double,
    increment
  }
})
vuex5给我们提供了use函数来获取其他state。只能说,简直太完美了,通过Compose的方式,我们可以在任何store里面组合其他store,从而达到我们自己想要的效果。
实现我们自己的状态管理
通过上述vuex5的新的特性,我们发现,其实vuex5是很好的利用了composition-api的思路,结合vue3 reactivity的特性,达到了这样的效果。基于这种思路,其实我们完全可以创建自己的状态管理耶,对不对?就像hooks出来之后,很多react 开发者,都放弃了redux,直接在项目里面结合useReducer实现状态管理。那在vue3里面,我们是不是也可以呢?我们一起来试一试吧。
第一步,我们结合reactive来定义我们的state:
// custom_store/info/state.ts
import { reactive } from "vue"

export interface infoState {
  info: string
}

const state: infoState = {
  info: "info from info state model"
}

export const createStore = () => {
  return reactive(state)
}
好了创建完了,可以使用了。如果我只说到这,你可能会顺着网线过来锤我,别着急啊,我们一步一步来。 上面我们创建了一个state,这里我们用到了reactive,是因为我们利用vue3-reactivity的机制来保证咱们创建的state变量是可响应式的。目前为止,我们只是定义了state。
接下来,我们来定义一些改变state的方法,即action:
// custom_store/info/action.ts
import { infoState } from "./state"

function chageInfo(state: infoState) {
  return (value: string) => {
    state.info = value
  }
}

export function createAction(state: infoState) {
  return {
    chageInfo: chageInfo(state)
  }
}
好了现在改变state的action也有了。接下来我们来把他们组合起来,让它们看上去更像vuex一点:
import { readonly } from "vue"
import { createAction } from "./action"
import { createStore } from "./state"

const state = createStore()
const action = createAction(state)

export const useStore = () => {
  return {
    state: readonly(state),
    action: readonly(action)
  }
}
是不是有那味了。这里为什么要利用readonly呢?是因为一般来说,我们不能直接修改state的变量,只通过action去改变state的值,增加readonly,我们就完美的实现了这一点。
接下来我们在vue组件中使用一下:
<template>
<div class="home">
<img alt="Vue logo" src="../assets/logo.png" />
<p>{{ info }}</p>
<button @click="changeInfo">
Click to change Info
</button>
</div>
</template>
<script lang="ts">
import { computed,defineComponent } from 'vue'
import { useStore } from '../custom_store/info'
export default defineComponent({
name: 'Home',
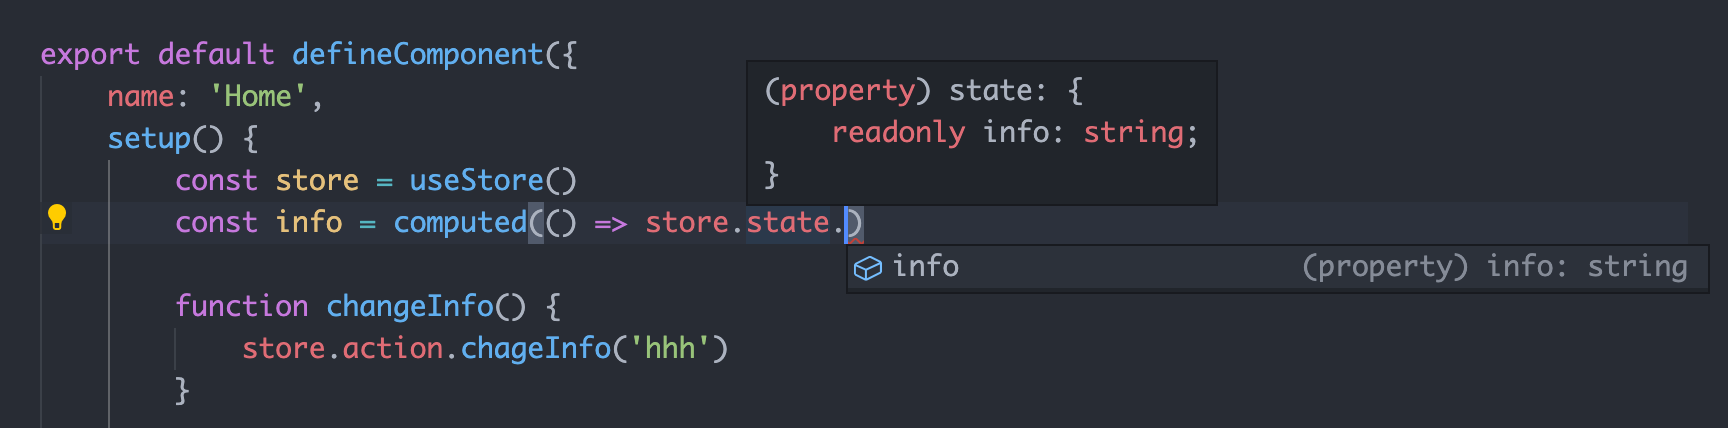
setup() {
const store = useStore()
const info = computed(() => store.state.info)
function changeInfo() {
store.action.chageInfo('hhh')
}
return {
info,
changeInfo
}
}
})
</script>
是不是完全和vuex5的使用方式一模一样,而且不知道你注意到没有,我们完美的实现了对typescript的支持,所有的类型都会被自动推断:
还有,其实我们也同时实现了store compose,我们只需在任意想要的store里面,导入其他任意的store即可。同时我们也支持其他的vue3的钩子,你完全可以自由组合。剩下的东西,留给小伙伴们自己探索咯。
说到最后
可以说,react hooks 和 vue3 composition-api的出现。极大的变革了我们编程的思维方式,通过探讨vuex的今生后世,我们能够很清晰到认识到函数式编程的优点和前端的发展方向。这无疑是最近一年,前端最大的进步,结合typescript,从编程思想上,推动了前端的发展。话不用多说,各位小伙伴赶紧操作起来吧。
另外,如果想查看文章的示例代码,请点击这里:vue-vite-template.
题外话
同时也打个小广告。最近写了一个小玩意:monia-cli
什么是 monia-cli?
这是一款同时支持
vue2、vue3、react、flutter的项目脚手架。monia-cli 能做什么?
1、每次新建项目,我们需要花大量的时间去新建一些重复的代码文件,例如
request,config等等,“不会偷懒的程序员不是好程序员”。利用monia`,你完全可以省掉这些重复的工作。2、
monia所提供的template都是目前最新的,最全的项目template。其中vue3的template,monia采用了最新的vue + vite + typescript的项目组织方式。flutter的template,会帮你省掉很多重复的工作,包括comon componts,comon utils等等。3、
monia本身还支持错误提示,命令联想等功能。4、使用示例:
monia create test_flutter_app